Tuesday, November 6, 2012

It's almost Christmas: LED vs traditional C9 lights

I've always been traditional with my outdoor Christmas lighting - only the good ol' C9 incandescent light strings are good enough to put on my house.  I've had a number of 25-bulb strings for about 25 years, but since adding solar to our roof in 2010, I've been aware of just how much electricity my holiday lighting is using.  The miniature lights are much better than C9s on a one-for-one basis, but most mini-light strings put their bulbs much closer together than the 12" spacing of my C9 strings, so they're probably somewhat better, but maybe not so much - not enough for me to switch.

The other thing that's always frustrated me about C9 lights are their fragility.  It seems like no matter how gently I put up and take down the strings, every year I have to go through the ritual of finding and replacing the burned out bulbs before stringing them on the house.  And invariably, the one bulb at the apex of the roof burns out 2 nights after I put it up.  And with bulbs going for at least 25¢ apiece, I figure I spend at least $2-$3 a year in bulbs.  There's gotta be a better solution...
Philips C9 faceted Christmas lights

Enter the LED C9 strings.  I bought 4 25-bulb strings of Philips multicolor LED faceted C9 light strings  at the local Target to compare to my incandescent C9 strings.  Although I had a slight preference for the smooth bulbs, I didn't care for the light dispersal as much - the faceted ones seemed to illuminate the entire "bulb" better.

First test:  Energy efficiency

C9 incandescents - about 160 watts

Using my trusty Kill-A-Watt energy meter, I plugged in an incandescent C9 string.  Just about 160 watts (I had a few flashers in the string, so the wattage varied about 10 watts or so as bulbs flashed on & off).  C9s are rated at 7 watts apiece, so a full 25-light string of standard bulbs should be about 175 watts.

C9 LEDs - just 2(!) watts
Next up was an LED strand.  I plugged it in and looked: 2 watts!  The entire string was using less than one-third of the electricity that one C9 bulb consumed!

Second test:  Aesthetics (how they look)


I know what you're thinking - these things must be ridiculously dim.  Truth be told, they are significantly dimmer than C9 incandescents.  But the only way to truly judge is on the house, in the dark, side-by-side - so that's exactly what I did.  The photo below shows a string of incandescent C9s on the main house (starting to the left of the garage door) and a string of LED C9s on the right (over the garage door).  The difference is obvious - you could probably read a book by the incandescents, while the LEDs serve to add just a hint of color to the roofline.
Incandescent C9s on the left, LED C9s on the right
(click for an enlarged image)

As much of a traditionalist as I am, I was surprised to find that I actually prefer the LED lights.  They don't light up the walls of the house, so they don't get washed out by their own brightness.  Couple that with the energy efficiency and lack of annual maintenance, and we have a winner, at least in my book.

Third test: economics (are they worth it?)


So - aesthetics aside, is it worth it economically to use LED C9s instead of incandescents?

If you're buying new, I think that LEDs are a no-brainer unless you really have an issue with their brightness.  They cost about double upfront ($12 vs $6 per 25-light string), but factor in the need to replace bulbs and the electricity difference and the payback is probably 1-3 years.

In my case, I was trying to determine the payback period considering that I already had the incandescent strings.  Here's my thought process and calculations - you'll have to do the math for your scenario and see what works.

I have 4 strings of incandescents.  4 strings of LEDs runs $48.00 + tax - lets round to $50 (I bought mine on sale for $11 each).  I typically have my lights on between Thanksgiving and Christmas, about 4 hours each night.  My wintertime electricity rate is about 12¢ per kWh, so let's run the numbers:

Cost per year for incandescents:

  • Replacement bulbs:  $2.00
  • Electricity: 160 watts / string x 4 strings x 4 hours / night x 30 nights / year = 76,800 watts (or 76.8 kWh) x 12¢ / kWh = $9.21
So I'm paying about $11.21 per year for my current display.

Cost per year for LEDs:
  • Replacement bulbs: $0.00 (each sting included 2 replacement LEDs, but I can't imagine them going bad more than 1-2 per decade - time will tell).
  • Electricity: 2 watts / string x 4 strings x 4 hours / night x 30 nights / year = 960 watts (or 0.96 kWh) x 12¢ / kWh = $0.11
So I'll be paying 11¢ per year for the LEDs.

And the Winner is: LEDs

Factor in the upfront cost of $50.00 for the LED strings and you'll see that the breakeven point is between 4 and 5 years for my scenario.  Yours might be different, but I think that in most cases, there's still an excellent case to be made for LED outdoor Christmas lights.

Merry Christmas to you and yours!

Update 11/23/12:  X-10 modules and LED lights don't mix (well)


X-10 modules
I use the old BSR X-10 appliance modules to turn my outdoor (and indoor) Christmas lights on & off remotely - I've done it for years.  The switch to LED lighting brought out a problem - the X-10 modules "leak" a tiny bit of electricity when switched "off".  Appliances and incandescent lighting are unaffected by this, but it's enough to cause LED lights to not turn off completely.

Using the oracle of Google, one can find a number of solutions to this issue - most involving putting a small load on the switched side of the X10 module with the LED lighting - something like an incandescent night light, a plug-in air freshener or even a "wall wart" transformer.  There are also mentions of more sophisticated solutions involving opening up the X10 module and adding or removing resistors.

I opted for the low-tech approach of plugging in a wall wart on the switched side of my X10 modules.  Even without being plugged into anything the wall wart transformer draws enough energy to keep the LED string dark.  It's kludgy, but it works. 

Friday, September 28, 2012

Make a smartphone tripod mount for less than $10.00


Smartphones today have amazing capabilities, both as handheld computers and as digital still and video devices.  However, one thing that's difficult to do is to hold a smartphone steady when taking pictures.  A tripod helps immensely, but it's difficult to find a cellphone (or a cellphone case) that has a tripod socket.

A tripod is also very useful for taking panoramas or time lapses (or even combining the two!).

This is my DIY solution.  I think it has a number of advantages over other DIY designs, including:

  • Inexpensive - it can be made for less than $10.00, even if you have to buy everything - but you shouldn't need to.
  • Compact & portable - disassembles into  a very small space (about 4"x1"x1") and is lightweight (this is important if you're backpacking to your photo-op!)
  • Panorama-capable - can be made to position the lens directly over the tripod pivot - necessary for panorama photography
  • Adjustable - will work with most feature-phones and smartphones.

Parts list:

  • 3 3"x5/8" mending brace ($2.97 for a pack of 4)Note:  Measure the width of your cellphone and make sure that the length of the brace is at least 1/2" longer.  For larger phones, you may need to use a 4" or even 5" brace.
  • 1 3/4"x1/2" corner brace ($1.97 for a pack of 4)
  • 3 1/4-20 x 1/2" round head bolt & 4 1/4-20 nut ($1.18 for a pack of 5 bolts & 5 nuts)
  • Electrical tape or heat-shrink tubing ($0.71)
  • 1 or 2 Large rubber bands

Assembly:


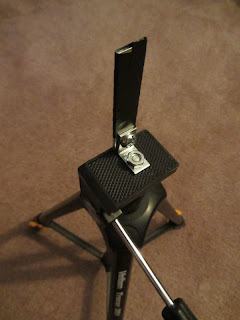
Wrap one corner brace with electrical tape, covering all but about 1/2" of one end.
Take the corner brace and attach it to the taped mending brace with a bolt and nut.  Make sure that the bolt head is on the inside of the brace.
Take one 1/4-20 nut and use it to attach the mount to your tripod's mounting screw.

Optional:  Panorama mount

If you plan to use your phone to take panorama shots, you'll need to ensure that your camera's lens is directly above the tripod's screw (on the axis of rotation of the tripod mount). For this we need to add a couple of extra parts.

Panorama mount assembly:

In place of step 3 above, take a second mending brace and attach it to the other side of the corner brace, again ensuring that the bolt head is on the inside of the corner.
Take a third corner brace and attach it to the second one.  Use the third hole (counting from the corner brace side) on the second mending brace and the end hole on the third brace.
Take one 1/4-20 nut and use it to attach the third corner brace to the tripod head, using the hole on the opposite end of the brace.

Mounting your phone:

Put the rubber band over the upright, taped corner brace.  Place the back of your phone against the back side of the brace and draw the band around the screen and looping it over the top of the taped corner brace.  It should be a tight fit.  If it's not, get a smaller rubber band (or loop the band over the bottom of the brace a few times to take up some  of the slack).

The photo above shows the completed simple mount on an Ikea Stam timer for doing timelapse panoramas.  See this page to build one for yourself.
If you're using the panorama mount, you'll need to adjust the angle between brace #2 & #3 (and possibly the angle of the corner brace relative to brace #2) to get the lens directly over the tripod screw.  Make sure you re-tighten the screws once the alignment is correct.
From the front, you can see how the phone's camera lens is positioned directly over the tripod's screw.  This yields the best panoramas.
Collapsed and ready for transport (LG Optimus S shown for size comparison)


Update 10/01/12:

Here's an even simpler, lighter design.  It's not as adjustable as the one above, but it should get you "close enough" for panorama shots.
 Basically, you just eliminate the 3rd mending brace in the design above
and rotate the angle bracket by 90°, then use the third hole out to mount
it to the tripod.  Rotate the angle bracket a bit more or less to center
the lens over the pivot point of your tripod.

The photo above shows the completed simple mount on an Ikea Ordning timer for doing timelapse panoramas.  See this page for inspiration.  To build it:

  1. Epoxy a 1/4-20 x 1/2" bolt onto center of the top of the timer.
  2. Epoxy a 1/4-20 nut to the center bottom of the bottom of the timer.
  3. Glue a piece of foam, rubber or other cushioning material onto the bottom of the timer.  It should be about 1/8" thicker than the height of the nut, so that if you mount the timer on a flat surface, the nut doesn't hit.
  4. Screw a 1/4-20 nut onto the top bolt, then put on the mount and finally a 1/4-20 bolt (or wing nut, as shown above) and tighten until the unit is secure.
If your camera is heavy and you want to use a modified timer like the Ordning for timelapse panoramas, you might need to use a counterweight to level the top of the timer.  You can use a third mending brace attached to the timer bolt, sticking out in the opposite direction.  Attach a bolt with a nut or two on it as a counterweight (or tape coins, lead weights, etc.).

Wednesday, August 22, 2012

A simple but elegant barn door tracker

Completed barn door tracker
If you've ever tried to take a photograph of the night sky you know that it's not easy.  Even with a good tripod, any exposure longer than a few second will start to result in the stars turning into streaks - commonly called "star trails".  Don't get me wrong - star trail photos can be absolutely beautiful, but if you want to see dim objects, you've got to move the camera in sync with the earth's rotation.

Enter the "barn door tracker".  You can read all about the theory on the Wikipedia page.  I'm here to tell you about my version, which can be made from easy-to-purchase materials and will cost less than $30.00. It's not a fancy motor-driven version - in fact, it's the simplest kind, good for exposures of no more than 5-10 minutes, but if you take multiple 5-minute exposures and "stack" them in software with a program such as StarStaX, you can get some truly inspiring results.

About tracking error

This (simplest) type of barn door mount will start to show errors (in the form of star trails) due to tangent errors.  The maximum exposure time will vary with the focal length of your lens.  Here's a rough guide:
  • Wide-angle lens (35mm or less) - about 15 minutes
  • Normal (50-60mm lens) - about 10 minutes
  • Telephoto lens (70mm or longer) - about 5 minutes

Materials list

(links may be out of date - most hardware is available at Lowes or Home Depot):

ball head ($13-20)
1 8" strap hinge ($6.00)
1 1-1/2" 10-32 round-head bolt  ($1.20 for 5 - includes 5 nuts) - this will give a maximum of about 20 minutes of exposure time.  If you want longer, use a longer bolt (2" or even 3"), but be aware that this type of tracker isn't designed for exposures of more than about 10 minutes, due to tangent error.
1 1/4"x3/4" flat weasher ($0.07 in the store) - that's a 3/4" diameter washer with a 1/4" diameter hole
1 1/2" 1/4-20 flat head machine bolt ($1.20 for 4, includes nuts) - needed only if ball head doesn't come with an attachment bolt
1 1/4-20 wing nut ($1.20 for 2)
2-part epoxy ($4.00)
1 plastic straw (free - go to McDonalds and order a drink!)
1 wooden popsicle stick (free with a nice, cold popsicle - and don't you want one right now?)
1 small piece of flat, smooth plastic (I cut one from a strawberry container, but most anything that's thin and slick should do - an old CD case lid, perhaps?)

Construction details

When making barn-door trackers, there's one critical dimension - the radius of curvature.  This is the distance between the lifting screw and the center of the hinge.  This depends on two factors - the speed  (in Revolutions Per Minute, or RPM) with which you'll be turning the screw and the number of threads per inch (TPI) of the screw - in other words, how far the camera platform rises with each turn of the screw.  Here's the formula (shamelessly stolen from this barn door website, which has an elegant motor-driven tracker that's worth a look):
Radius (in inches) = RPM / (0.004375 x TPI)

We're going to assume 1 RPM (because it's easy to do with a watch handy) and we're using a 10-32 bolt (a #10 size with 32 TPI), so the calculation becomes:

Radius = 1 / (0.004375 x 32) = 7.142 inches (or 181.5 mm)

We're in luck, because the 8" strap hinge just happens to have a hole centered about 182 mm away from the center of the hinge!

Assembly instructions

  1. Using the 2-part epoxy, attach a 10-32 nut to the 3/16"x3/4" washer.  Be very careful not to get epoxy on the threads!
    Bolt and washer attached to strap
  2. Once the washer/nut combination has dried solid, use the 2-part epoxy to attach the washer to the bottom side of the top of the strap hinge. Before it starts to set up, make sure you break out your ruler and double-check the distance between the center of the nut and the center of the hinge!   If you can, set something heavy onto the assembly to ensure a good bond and set it aside to dry overnight.
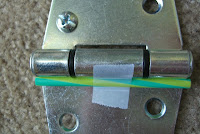
  3. After the above have dried completely, cut a small piece of flat, smooth plastic to fit over the hole on the other side of the strap hinge, just below where the nut is glued when the hinge is closed.  This will ensure that the bolt head has a smooth surface to ride across.  Attach this to the hinge with glue or double-sided tape.
  4. Drilled popsicle stick
  5. Now thread the 10-32 bolt into the epoxied-on nut.  Open the hinge and thread it from the side where the nut is.  When the hinge is closed, the head of the bolt should hit the plastic piece on the other side of the strap hinge, and the threaded side should come out the top.  Thread it almost all the way in.
  6. Carefully drill a 3/16" hole in the middle of the popsicle stick.  Thread 10-32 nut onto the bolt, run it down about 1/2", then put on the popsicle stick and thread another 10-32 nut on to firmly hold the popsicle stick in place.
  7. Open the hinge and attach the ball mount through the middle hole in the top arm of the strap hinge using the 5/8" 1/4-20 bolt.
  8. Sighting straw attached to strap hinge
  9. Attach a 3" piece of plastic straw to use as a finder scope to the lower part of the strap hinge where it meets the hinge.  You can use tape or glue to keep it in place, but make sure it's as parallel to the hinge as possible.
  10. Use a 1/4-20 wing nut to attach the strap hinge to your tripod using the center hole in the bottom arm of the strap hinge (the one directly below the ball mount).

Using your barn door tracker

To use your barn door tracker, take the completed unit to a dark sky area.  Using the finder straw, find Polaris (the north star, the star in the handle of the little dipper furthest from the bowl).  Now move the straw about 3/4 of a degree toward the top star of the bowl.  Your tracker is now pointed properly.

Now mount your camera to the tracker and screw the screw so that the two halves of the hinge are parallel to each other.  If you haven't already done so, set up your camera.  Here's some of the settings you'll want to use:
  • Aperture:  open all the way
  • Shutter:  the longest possible setting.  If you have one for multiple minutes, use it.  Otherwise you'll need to use the "bulb" setting and open and close it by hand.
  • ISO: 800 or 1600 (you can go higher if your camera doesn't introduce too much "noise")
  • Zoom:  to taste - with lower zoom settings you can shoot longer exposures before the errors inherent in the barn door tracker cause trails
  • If you have a DSLR, turn off mirror lockup
  • Turn off the "review" setting (showing you the image after its taken)
  • If possible, set your lens to manual focus, and focus to infinity
  • Turn off any image stabilization
  • Remove any lens filters for maximum light transmission
  • Shoot in RAW format if possible
 Once you've set up your camera, you're ready to shoot.  Point the camera to the area of sky you want to photograph and open the shutter.  Now start turning the popsicle stick at at pace to match the second hand on your watch.  If you don't want to be moving it continuously, you can  follow this guide, depending on the focal length at which you're shooting:
  • With a wide-angle lens (35mm or less), you'll need to turn the stick 1/2 turn every 30 seconds
  • With a normal (50-60mm lens), you'll want to turn 1/4 turn every 15 seconds
  • If you use a telephoto lens (70mm or longer), you need to turn 1/12 turn every 5 seconds.

Acknowledgements

Many people have documented their builds, some have provided additional information which has been summarized above.  A shout-out is due - you can use these links to learn more information or build a mount that suits your needs better: